By Dee Archibald
You will need: 
- Lots of small pieces of driftwood
- A piece of plywood
- A piece of polyethylene
- Some exterior wood glue
- Gravel or small rocks (for drainage)
- Potting mix
- Plants
- Moss
 Step 1: Fossick! You will need to take a walk on a beach or river near you and collect the driftwood needed to make this project as I’m not sure if there are places that sell it. Depending on your final shape you will need to get a mixture of straight and bendy bits and also thick and thin pieces.
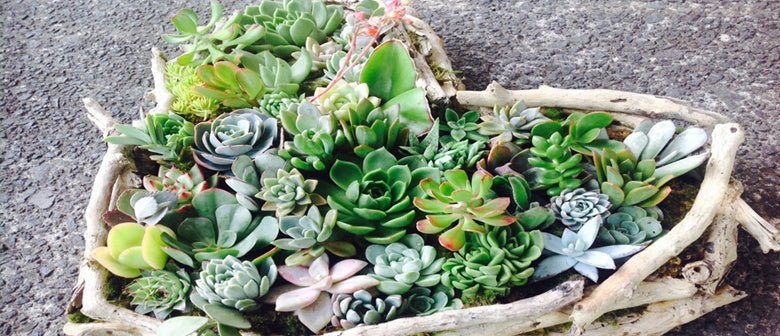
Step 2: You will need to cute your plywood with a jigsaw to the desired shape you are after. I’ve gone for a heart shape one for mum! Put some cardboard underneath and begin choosing pieces of wood to place around the edge of your shape until you have made the first layer. Once you’re happy with the placement start to glue it down onto the board.  Continue by adding another layer with the same process. You may want to let each layer dry in between if you don’t have much of a steady hand. Keep working your way up until you are happy with the height or you run out of driftwood (whichever comes first).
Tip – you can add smaller sticks in with glue if there are any gaps between layers. Try no to get too much glue on the outside, (it can be wiped with a wet cloth) the inside is fine to get pretty messy as you won’t see it so go nuts there with the glue! 
Step 3: Once dry (I would recommend giving 24 hours for it to dry) more or less cut your polyurethane to size and stick the bottom side down to the ply board. Press it into the corners and glue as high up as you can to the driftwood frame. Then cut it all the way around so that the plastic won’t show out the top.
Step 4: Add a layer of your small stones or pierce a few holes in the plastic for drainage (this step really depends on if you are going to keep your planter inside or outside). Next add soil of the top of the plastic and  press it down firmly. Add your plants buy using a teaspoon to dig a small hole and pack soil around it or if your using cuttings you can pole a hole with the end of a small paintbrush and press the plant in. Once all the plants are in, break up bits of moss and wedge between the plants and around the edges where there are gaps.
Tip – when planting, start with your biggest plants first, placing them evenly around the space so it’s visually balanced. Then add the smaller ones while also thinking about evenly placing taller and shorter varieties to give a 3 dimensional shape.

Happy Crafting! x