By Dee Archibald
It’s always the same, after every birthday you gather up a bundle of single use greeting cards from your mantle and plonk them  in the cardboard recycling. Well here’s an idea which is like a gift within a card- the gift card that keeps giving! And if you make a whole batch at once you won’t need to buy another greeting card again!
You will need:
- Some coloured paper (I used some napkins)
- Some newsprint (preferably not printed on)
- 2-3 packets of wildflower seeds
- Some heads of dried flowers and tiny leaves (optional for decoration)
- Glitter (again optional)
- 3-4 Chux cloths
Tools:
- A blender or food processor
-
 A screen (I used an old picture frame which I attached a piece of netting to with a staple gun but I know you can buy paper making kits and screens at art shops if you think you will use it again)
 - A hole punch
- A rolling pin
- Sharp scissors
- Cookie cutters
Step 1:
Rip your paper into tiny squares and soak it in water, then pop it in the food processor. You’ll get a feel for how much is needed once you blend it and may need to do another batch. Blend it until it is pulp like. You may need to add more water to get it moving.
Step 2:
Put it in a bowl removing as much excess water as you can, and mix in your seeds, dried flowers/ leaves and glitter. Make sure you mix well. Put 2-3 layers of chux cloth onto quite a thick newspaper (to soak up the water) then put your screen on top. Turn the pulp onto the netting of the frame and squash down to make as flat as you can with your hands. Then add another layer of chux cloth on top and flatten using a rolling pin. You want it flat (around the thickness of cardboard) without pressing too hard and cracking your seeds.
Step 3:
Peel the chux cloth off the top and lift the frame off the Bottom layer of chux cloth. Leave your handmade paper on the frame and find a place for it to dry. Dry it quickly, if it’s a hot day put it in the sun and then overnight in the hot water cupboard. Make sure there is airflow going through the netting underneath so it drys both sides. Should be ready to cut within 24hours.
Step 4:
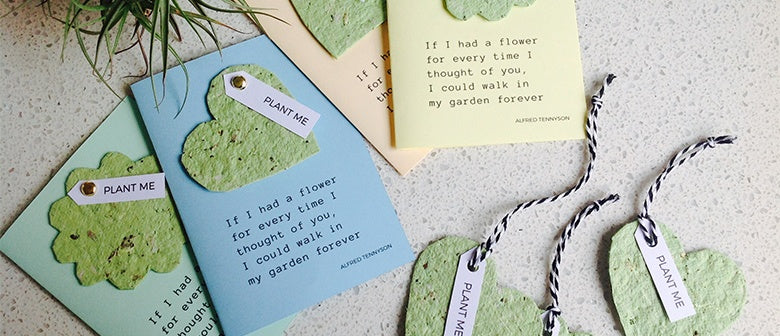
Use cookie cutters to trace a shape on your paper with a pencil and then cut the design out and punch a hole in the top. Attach your tag to a piece of twine and hang from your gift. Or print up some little gift cards like I have, attaching your tag with a paper binder. I also made up some cute little “plant me” labels so your recipient gets the idea.
Tip: Don’t waste your paper scraps after cutting, plant them in your garden or a planter to enjoy some wildflowers of your own!
Happy Crafting x