By Dee Archibald
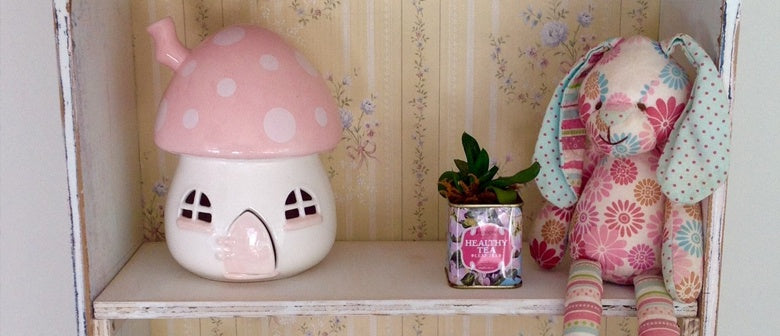
I was going for a ‘rustic charm’ when putting this project together but you might like to change the finish for a neater rolled paint look or white wash to fit in with your decor. Either way you go I’m sure it will be a cute addition to get creative with.
You will need:
- An old wooden drawer (I found this one at Junk and Disorderly, a secondhand trash and treasure store, here in Auckland)
- A funky knob (available at antique stores) – optional
- 2x hooks for the back on each side (optional – should you decide to hang it)
- A piece of ply big enough to make a shelf from
- A sheet or off cut of wallpaper (I found my retro roll again at Junk and Disorderly)
- Sand paper (and an electric sander if you have one)
- Paint
Step 1: Paint. There are a few options here in terms of finish.
The clean polished look: Sand all sides except the bottom of the drawer until smooth then roll on 2 coats of desired paint (this is how the final product will look in terms of finish).
Washed paint look: Sand all sides except the bottom of the drawer until smooth then make up a solution of watered down paint. Start with quite a watery solution and when it dries add another layer this time adding more paint to the mixture and brush it on haphazardly so you can see the first layer underneath. You might like to follow the process a few more times and sand back between layers or just sand back a little at the end. Have a play around and get a feel for what look you want the overall finish to look like.
Rustic paint look: Don’t bother with sanding to start with just brush on 3-4 coats of different coloured paint letting them dry in between. Leave the bottom as it will be covered with wallpaper. As you can see my draw was blue to start with then I added a soft blue, soft pink and finished with white. Don’t be too perfect with putting each layer on or put it on too thick, as once you sand it back you want to see all of the layers right back to the wood in parts and it’s going to take a lot of sanding as it is!
Step 2: If you are making the rustic version like I did, this is when the electric sander comes in handy! Use it to buff away the layers in parts especially around the edges and over any uneven surfaces. You will get a feel for how rough you want it to look and when to put the brakes on the sander. It should start to look at bit like the bottom right image below.
Step 3: Measure the back panel of your draw and cut a piece of wall paper the same size. Stick it down with glue. Wallpaper glue would probably be best if you have some, I just used my glue gun though and it came out okay.
Step 4: The way you attach your shelf will depend on how you want to use it. I wanted mine to be able to be removed to give me flexibility with what goes in it so I screwed in a couple of rails to balance it on, but you might like something a little more permanent. In which case I would probably screw that shelf in from the outside of the drawer bogging over the screws to make the workmanship more invisible.
Step 5: (optional) Lastly you will need to screw your knob to the top if you decide you like that feature and your hook/s to the back if you would like to hang it.


